
티스토리 뷰
며칠 뜸했던 것은 슬슬 《핸즈온 머신러닝》 교재를 구매해서 보는 게 좋겠다 싶어졌기 때문이다. 그렇지만 당장 그 책을 사도 기본 자료구조에 대한 이해도 부족한 내가 따라갈 수 있을까, 의문이 들었다. 이미 사둔 책도 있었고.
그러던 차에 이번주부터 이미지 분류기라는 새로운 주제가 시작되어서, 그냥 따라가 보기로 했다.
출처는 언제나처럼 《핸즈온 머신러닝》 2판(자료는 멘토님이 제공해주심)
import tensorflow as tf
from tensorflow import keras
import matplotlib.pyplot as plt

tf.__version__
keras.__version__
tensorflow와 keras, matplotlib을 준비한다. 버전 확인까지.
fashion_mnist = keras.datasets.fashion_mnist
(X_train_full, y_train_full), (X_test, y_test) = fashion_mnist.load_data()

X_train_full.shape
이상으로 데이터를 준비했다. 전체 훈련 세트를 검증 세트와 훈련 세트로 구분하고, 픽셀 강도를 255로 나누어 0~1 범위의 실수로 변경한다.
matplotlib의 imshow() 함수와 binary 컬러맵을 사용해 이미지를 출력해보자.
X_valid, X_train = X_train_full[:5000] / 255., X_train_full[5000:] / 255.
y_vaild, y_train = y_train_full[:5000], y_train_full[5000:]
X_test = X_test / 255.

plt.imshow(X_train[0], cmap = "binary")
plt.axis('off')
plt.show()
def save_fig(fig_id, tight_layout = True, fig_extenshion="png", resolution=300):
    path = os.path.join('C:/crawling/연습문제푼것들/test', fig_id + "." + fig_extenshion)
    print("그림 저장: ", fig_id)
    if tight_layout:
        plt.tight_layout()
    plt.savefig(path, format = fig_extenshion, dpi = resolution)
그림을 저장하는 함수를 쓰지 않으면 다음을 진행할 수 없길래 헐레벌떡 찾아옴
n_rows = 4
n_cols = 10
4행 10열로 이미지를 뽑아볼 것이다
plt.figure(figsize=(n_cols * 1.2, n_rows * 1.2))이미지의 크기는 1.2*1.2로 하자
for row in range(n_rows):
    for col in range(n_cols):
        index = n_cols * row + col
        plt.subplot(n_rows ,n_cols, index+1)
        plt.imshow(X_train[index], cmap="binary", interpolation="nearest")
        plt.axis('off')
        plt.title(class_names[y_train[index]], fontsize=12)
plt.subplots_adjust(wspace=0.2, hspace=0.5)
plt.rc('font', family='Malgun Gothic')
save_fig('fashion_mnist_plot', tight_layout=False)
plt.show()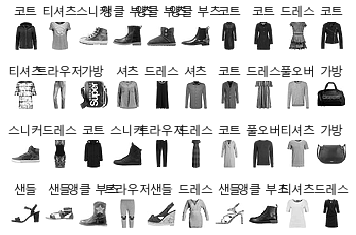
plt.rc('font', family='Malgun Gothic')이 코드를 쓰면 한글이 정상적으로 출력된다.
계속해서 keras로 다층 퍼셉트론을 구현한다: sequential API를 써서 이미지 분류기를 만들어보자.
우선 입력층은 28*28개의 입력 노드를 갖고, 두 개의 은닉층으로 이루어진 분류용 다층 퍼셉트론이 만들어진다.
출력층은 10개의 출력노드로 이루어져 있다.
model = keras.models.Sequential([
	keras.layers.Flatten(input_shape=[28, 28]),
    keras.layers.Dense(300, activation="relu"),
    keras.layers.Dense(100, activation="relu"),
    keras.layers.Dense(10, activation="softmax")
])
모델 레이어를 확인하면 다음과 같은 결과가 나온다.
model.layers
모델의 요약본.
model.summary()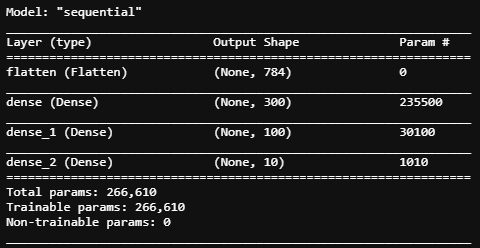
'공부 > Python' 카테고리의 다른 글
| 미래의 나를 위해 남겨두는 문자열 리스트 정형화 함수 (0) | 2020.12.18 |
|---|---|
| 파이썬의 자료구조 (0) | 2020.12.15 |
| 20201207 mapboxgl로 시각화 연습 (0) | 2020.12.07 |
| 워드클라우드를 만들어봤다 (0) | 2020.12.03 |
| 20201126 DAY20 scatter matrix (0) | 2020.11.26 |
공지사항
최근에 올라온 글
최근에 달린 댓글
- Total
- Today
- Yesterday
링크
TAG
- 코테공부
- 개발자포트폴리오
- 자격증
- todayIlearned
- 이자포스터디
- 데이터준전문가
- 데이터준전문가합격후기
- Til
- 인공지능
- Notion2Tistory
- data annotation
- 커리어코칭
- 빅분기합격
- 자버
- 깃허브
- ADsP합격후기
- 빅데이터분석기사
- 코드스테이츠
- ai부트캠프
- googlecolab
- 이력서
- 빅데이터
- 빅분기
- 취업준비
- ADsP
- 데이터분석
- Kaggle
- github
- 데이터과학
- 빅분기후기
| 일 | 월 | 화 | 수 | 목 | 금 | 토 |
|---|---|---|---|---|---|---|
| 1 | ||||||
| 2 | 3 | 4 | 5 | 6 | 7 | 8 |
| 9 | 10 | 11 | 12 | 13 | 14 | 15 |
| 16 | 17 | 18 | 19 | 20 | 21 | 22 |
| 23 | 24 | 25 | 26 | 27 | 28 |
글 보관함